I recently transformed a Wedding Dress into a Memory Bear.
When I was ask to do this I did think long and hard about it for a couple of months.
In the end I decided I quite fancied the Challenge.
I've made plenty of Teddy Bears over the years. BUT never one in Silk.
Here is the rather beautiful and elegant Wedding Dress. Classy and understated I'd say.
The Pattern
It took a while for me to choose a Teddy Pattern. I wanted one that reflected the personality of the Dress. Which in turn I hoped would reflect the personality of the recipient. So I eventually choose a Classic Jointed Teddy Bear Pattern from My Fabric Heaven. I chose them because they had a good selection of patterns and I could have the pattern sent to me. They do offer pdf's but on this occasion I wanted to have a physical copy.
The Owner
I had only met Emma a couple of times, so I can't claim to know her personality very well. But those meetings along with the Wedding Dress gave me a feel for how this Project should progress.
The Dress
I must admit as I worked with the dress the ideas flowed. Emma's Wedding Dress was not fussy and so I felt the need to keep Emma's Teddy 'Simply Elegant'.
At first I thought there was not a lot going on in the Dress for me to Play with.
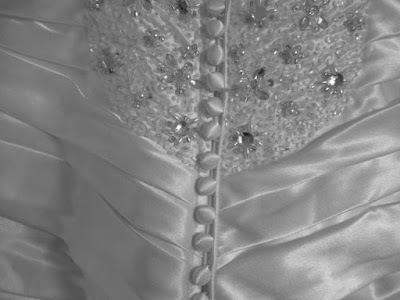
There was no lace and it wasn't over blingy. But on closer inspection it did have some rather Stunning Features.
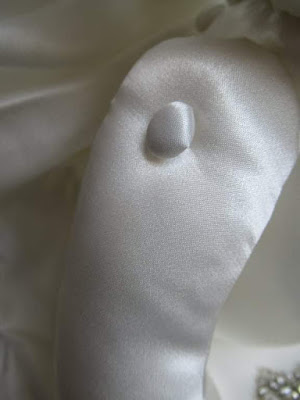
The Tiny self covered Silk Buttons all down the back.
The Tiny Jewels and Beading - A touch on either side of the back and the front neckline.
Then there was the one Stand out feature. The Cluster of Tiny Jewels stitched together to create a stand out feature on the Dress front.
The Bear
And so I began the Bear with no definite idea other than the Bear bones of the Classic Bear Pattern.
But don't panic. This is my usual/default way of working. I start off with an idea in my head of what I want to make. Begin the project. And then let the project tell me how it wants me to make it. And this Bear was no exception. I certainly didn't turn out looking how I had envisage at the start!
Now, as I said earlier I have made many a Teddy Bear - most of them out of Fur Fabric, which I have now discovered is very forgiving compared to working with Silk.
Knowing how easily Silk can fray and how much thinner it is than my usual Bear making fabrics, I decided to line the whole Bear. I used the lining of the Wedding Dress as Bear lining. And so I cut out two sets of Pattern pieces (one in Silk and one in the Lining fabric)
The Preparation
I thread my Sewing Machine with a fine (Aurofil) thread. Put in a small needle (70). Silk needs a delicate touch, you don't want a big needle creating holes in you Silk or a thick thread being dragged through with the fine fabric.
Stitch length needs to be quite small as you don't want any of the stuffing poking through large stitch spaces. I set my machine stitch length to 2.2.
I did a few test stitches on scraps of the Silk to make sure I was happy with my setup before I began work on The Bear.
The Stitching
And so the Stitching began. The pattern started with the head. But knowing this is the most fiddly part to make, I chose to start with the Arms, then the Legs, onto the Body and finally the Head. All seemed to go well apart from the head which I got a bit wrong the first time, I knew it was going to cause me trouble! Anyway I got it right second time.
The Stuffing
Stuffing the Bear parts was quite a long job. The Silk parts took a lot more stuffing than I have ever used in a fur Bear. That was because you can see every ripple and crease on the Silk so the parts needed to be stuffed as tightly as I could to 'smooth' out the Silk. And this was where it all went wrong. The head you see in the picture is not the one that is on the finished Bear. In my efforts to stuff the head tightly the seam frayed and came apart. There was no way I could re sew it! So I still have the offending Bears head in my Sewing Room. I'll probably keep it as a reminder.
The Construction
Once I had all the body parts assembled I needed to start putting Emma's Bear together. The pattern was for a jointed Bear. Her joints were stitched using a strong thread and buttons. I used the Tiny covered buttons from the back of the Wedding Dress.
Her head was not jointed but Ladder Stitched in place.
The Face
Now I had the Bear together the fun/terrifying part began. Those of you who have made any dolls, bears or soft toys will understand how challenging it can be to create the face you imagine in your minds eye. The eyes are the most challenging. Too close together looks angry. Too far apart looks, well, a bit crazy. The mouth is next. It creates expression, and can amplify whatever the eyes are expressing. The nose although not so crucial can create great character. Something that can get overlooked is ear placement, that can change a face from serious (higher on the head) to more comical/cartoon like (lower/further apart on head).
The Personalisation
So Emma's Bear now has a face. Happy Days. Next on the agenda is 'Personalising' Her. Remember Emma's Wedding Dress. It was Elegant. There were jewels, beads and lovely little buttons. Not everywhere, not in your face but definitely there. And there was one Stand out feature on the Dress front.
I toyed with the idea of Stitching this onto her head. This idea had been in my head since I first saw the Wedding Dress. But the Bear, she didn't like it there no matter which way around I placed it.
No Emma's Bear decided she wanted that piece of bling on her front.
I loved the subtle detail in amongst the jewellery on the Dress. There were lots of tiny beads in the background. I knew from the beginning I wanted to stitch Jewels on one sole of the Bears foot. I'm a big fan of the Paul Simon, one of my favourite Albums of all time is Graceland and the track Diamonds on the Soles of Her Shoes was the soundtrack to my making this Bear. I just loved the idea of one bejeweled foot! It ended up being seed beads, but that was because they fitted the bill. They looked so much more elegant than the shiny Jewels so I'm taking artistic licence and calling them Diamonds! In fact hand stitching the Tiny beads (Diamonds) onto the sole of her foot took ages because I could only work on it for 10 to 15 minutes before my eyes needed a rest.
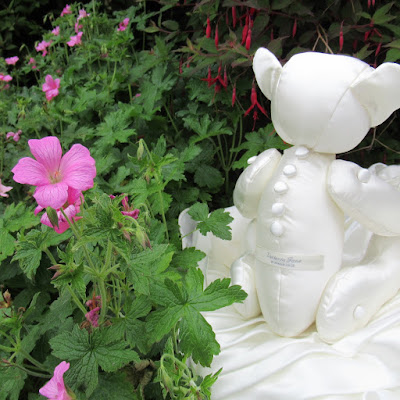
Front complete I turned my attention to the back of Emma's Bear. I knew I wanted to stitch the Tiny Buttons down her back to echo the back of the actual Wedding Dress. I flirted with the idea of some Jewels on the back too, as there were some on the back of the Wedding Dress. But The Bear said no. She was not happy when I placed them anywhere on her back. Fair enough I thought. Although I felt the back did need something. But I just couldn't work out what. By this point I had also started work on my plans for the Garter Emma had asked me to make. And it was while cutting fabric off the Dress for the Garter that I saw on the inside of the dress the little label. I don't know why I had never noticed it before. Anyway I unpicked the little label and placed it on the back of The Bear, ta da! That was what it needed.
I had planned on stitching some of the bling from the Dress onto the Bear's ear. But the Bear didn't approve of that plan either. She wanted to be simply Elegant. In fact she wasn't too sure about the big jewel on her front, she only agreed once I had cut it right down in size not once but twice!
So there she was. Complete. Elegant. Happy and Rather Pleased with Herself.
The Bag
While She was a work in progress I covered her over with a large scrap of the Wedding Dress underskirt whenever I wasn't working on her to ensure she was kept clean, (along with lots of hand washing so as not to mark the Silk). Once she was finished I began to think about getting a Box to deliver her in. Then I thought, um, this piece of fabric that has protected her all along could be upcycled into a Bear Bag. I stitch some more of the Dress bling onto the bag and unpicked the hanging straps from inside the dress. I used one as a drawstring for that bag. I was very pleased with the results.
The Garter
Finally I turned my attention to making a Garter. It might sound odd but the thought of making a Garter seemed quite daunting. I knew how to make a Bear so that didn't phase me. But a Garter, well I'd never made one. I researched making Garters on youtube and Google. But in the end I made up my own way of making one. And I don't know why I got so worried about it. What I did was dead simple and looked lovely. I put some silver thread into my overlocker/serger to add a touch of bling to the edges, added some elastic and hand stitched some of the Jewels onto it. It was such a quick and easy make. To complete the project I made a tiny matching bejeweled bag for the Garter and used the second hanging strap from the Dress for the drawstring.
The Roundup
All in all a rather satisfying project/challenge. Although it did take me a lot longer to make than I had anticipated, but I am so glad I did it. As always when making things up/improvising as you go along it was a learning curve, and I've definitely improved my 'Silk' skills along the way!
I hope you are enjoying following my Stitching Journey. I really enjoy taking the pictures, writing things down and sharing them with you.
So, what is my next challenge? Well, I bought two patterns from My Fabric Heaven. The second one was an Elephant. I'm tempted to try him in Denim. So watch this space, and thank you for spending some time with me, Joy


2 comments:
So lovely and elegant!
Thank you. That was my aim, to make an Elegant Bear.
Post a Comment