Posts

Showing posts with the label patchwork

Winter Village so far....

Image
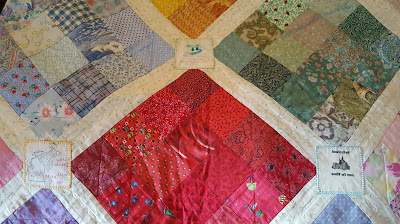
 Thought I'd give a progress report on the Winter Village Quilt I'm currently working on. It's Called Winter Village by Edyta Sitar The Pattern can be found at  Laundry Basket Quilts but it is also in Edyta's Book  A Season In Blue I started working on this Quilt in April 2024 I made a good start following Edyta's YouTube instructions. But then like the Blackbird Crafter I am got sidetracked by lots of Shiny Little Projects... In between these Beautiful distractions I stitched a few Houses here and there over the months. There were 23 Blue Houses in total. Although I did make a rouge Red One just for the fun of it I have Built all the Houses now. And have made a start on the Quilting. Lots yet to do. Including some Appliqué Branches and Birds. What do you think of it so far?

Boro Inspired Stitching

Image
 Hello there my Stitching Friends. Today I want to share with you my latest Boro Inspired piece of work.  I find this Traditional Japanese style of stitching wonderfully relaxing. It's based on need rather than decoration but still manages to produce a visually strong finished piece of work.  I'm making my piece of Boro fabric into a Bag. But technically that's the wrong way around! Boro traditionally didn't start It's life as Boro. It slowly became Boro over years of daily use and mending..... Boro is filled with lots of lovely Hand Stitching called Sashiko in thick thread often  contrasting the fabrics it covers. (Think basic running or quilting stitches.) This simple stitch intended to be functional also creates a fabulous visual impact. Read my post on Boro Needles and Threads  Here The bag I'm making came from this   Boro Bag link I've thoroughly enjoyed the project. So much so that I created a YouTube Video showing how I created this piece. You c...

Goldilocks and the Three Bears

Image
My grandson has this week discovered the Joys of Goldilocks and the Three Bears. A little cabin in the woods that I made for my granddaughters about fifteen years ago. I really enjoyed designing and constructing The Three Bears Log Cabin.  The Three Little Quilts were a bit of a challenge. I enjoyed choosing the fabrics for the curtains, night sky and wallpaper. I made the mattress on Daddy Bear's Bed Too Hard Manna Bear's Too Soft And Baby Bear's Just Right. It really was a lot of fun working out how to make The Three Bears, Goldielocks, the fire, carpet, picture, table and chairs and of course three bowls of porridge. I'm very proud of my efforts in this project. Why not Check Out My Other  Social Media Links

Quilt As You Go All Finished - Well Almost

Image
Quilt as you Go I've just finished my Lynne Edwards Sampler Quilt. I really like it. We did use  a few non Lynne Edwards blocks. Just because I liked them. I intend doing some hand quilting in the sashing. But that can wait a while. Meanwhile here are some pictures. Sampler Quilt  I made twenty blocks. This is the back of the quilt. I used up all my scrap pieces to make the back. Close ups of the quilting - back view. Close up of some patterned stitching I used for quilting. See the black blur/smudge at the bottom of the quilt? That was my new kitten Sparky darting across the quilt! So it looks like Daisy and I have a new apprentice to help us quilt. Quilt As You Go This project used Quilt as you Go joining. It's a lovely way to work as each Block is complete including Quilting before being joined together to make the whole Quilt. More about Quilt as you Go I would be thrilled if you checked out my other...

Talking Quilts

Image
I wanted to let you all know that The Quilters Guild of the British Isles Talking Quilts Project is now live on-line. I was involved both as an Interviewer and an Interviewee  (is that a real word?) Here are a few pictures of my YK2 Quilt which I was interviewed about. The link below will take you to the  Wales page which is where all the interviews I took part in are. You can either read or listen to the interviews and look at pictures of the quilts. http://www.talkingquilts.org.uk/interviews/wales/ ENJOY! And then check out my  Social Media Links

Finishing Off - Binding your Quilt

Image
Quilt as you Go  Quilt Binding  As our  Sampler Quilt Blocks  have all been made and we start stitching them together, our thoughts turn to finishing our Quilts. And that involves squaring off, making the binding and attaching the binding. All these Quilts were made using the Quilt as you Go method.  Find out more about joining  Quilt as you Go Sampler Quilts  Below are the first three finished Quilts. Then scroll down to the bottom of the page to see my three videos.  1. Squaring a Quilt.  2. Making Quilt Binding.  3. Attaching binding to your Quilt.                                Heulwen' s Sampler Quilt Mary's Sampler Quilt Yvonne' s Sampler Quilt How I Square Up A Quilt  This first video shows how to square up your quilt. Marking Quilt Bindings This second video shows how to make quilt binding Attaching Your Quilt ...

Making a Block Keeper

Image
A few people have been asking how to make my Block Keeper.  So I thought I should repost a link to my Video Tutorial. First some pictures of said Block Keeper. Sew - here is my Quick and Easy Block Keeper Video Tutorial And here is a link to  My Social Media Links I'm particularly enjoying Instagram at the moment. 

Quilt as you Go

Image
Quilt as you Go  Sampler Quilt Blocks For all of you who want to know how I put together my Sampler Quilt Blocks.    This was a good Quilt to make to help my group expand their Patchwork and Quilting skills.  Each Block was a complete piece of work. With the top wadding and backing and Quilting. This meant we were only ever dealing with a small piece of work. This Tangled Star proved quite a challenge for many. Even I had to have quiet and really concentrate while making it! I do like the echo Quilting on this Block. Nice Socks included with this Block! The Bow Tie was a lovely Block to make. I felt mine looked like a Box of Milk, White and Mint Chocolates! Yum Yum! And here it is finished and displayed on my sofa. The Binding I quite enjoy making and attaching my Quilt Binding. It signals I'm coming towards the finishing line of my Quilt. And what a difference visually once the binding is on a Quilt. Find out how I  Make and Attach My Bindings Quilt As Y...

Lions & Tigers & Bears Oh My

Image
Can you spot the mistake? - it's quite a major one. This is what sometimes happens when us quilters get over exited working on a project. I finished putting this quilt top together and laid it out to consider how I wanted to quilt it. Um......that's a strange way I've put those colours together I thought.  Why did I put all the pink on one side of the quilt? That was an odd thing to do. Then it hit me - I pieced the top in two halves - In my excitement to get the top completed I'd stitched and joined them together the wrong way around - Oh My! There's no way I'm unpicking it - all the letters have been heat n bonded and stitched down.  And there is hardly any of the fabric left to make new So on to plan B  I did have some flowers I'd cut out earlier and not used.  I needed to bring some pink over to the left side. I only had two Pink Flowers but visually odd numbers are better.  So I'm using a yellow one as well.  I...

Stunning Book Covers

Image
So proud of every one who brought in their finished book covers last week. Well done ladies. And they make a stunning display.   Great gift ideas.  I hope you're inspired to make some. How to  Make the Book Cover A chance to use some of the lovely fancy stitches on your  sewing machines. I just love the little Daisy Stitch on this Book Cover  There are so many different Embroidery Stitches you could try out on you Sewing Machine on this Fun Project For more from me Check out My Other Social Media Links

Part Two - Book Cover

Image
Ok ladies here is the video for part Two of the Book Cover. The Thursday Ladies done well. Below is a selection of their book covers all stitched and ready to make up.   Click here for Part  One And this is one finished Click below for the Video Hope you enjoy - Feel free to ask any questions. Yours in Stitches, Joy

Patchwork Book Cover

Image
Some of you will have made this Book Cover with me before. Gloria asked me for the instructions and I though it would make a nice little project to take my Thursday Ladies up to 16th July when we break for the summer. We did this first part in class this morning. So this is a recap. But I think the instructions are clear enough for any of my readers to follow along with us. They would make fabulous Christmas/Birthday presents. And Here is Part Two Enjoy and when you have a minute   Check out My Other Social Media Links

Quick and Easy Block Keeper

Image
My video today shows you how to make a quick and easy Block Keeper Below is a short video on making simple handles I have just realised the three step zig zag video is on my old sd card, so I will have to sort that out for you tomorrow. Yours in Stitches, Joy

The Point of Flying Geese

Image

Flying Geese

Image
Today we are making Flying Geese. Click on the link below to watch my video and join in with us. To make the block below, your will need: To make up18 Flying geese units So cut out 36 two and a half inch squares for the background And 18 four and a half inch by two and a half inch pieces for the geese. (I have cut six of one colour and twelves of another in the block below) I wil post my video on how to join the geese  together without loosing you points very soon.

How to attach your binding to your Quilt

Image
And now my dear Quilty Friends, following hot on the heals of my How to make/cut a quilt binding , I give you my How to Attach your Binding to your Quilt Video I'm thinking it would be a good idea for those of you new to this technique to make up a sample piece. What do you think? I could talk you through that if you wanted. Let me know. Yours in Stitches, Joy

Paper pieced Tumbling Block

Image
Continuing playing with English Paper Piecing I give you A basic Tumbling Block Sew, starting with three 60 degree diamond shapes in three different shades/patterns of green (choose any colour you like)  Using the same technique as we did for the hexegons, stitch the fabric over the papers. Then  Stitch two of the diamonds into a V shape And to complete the tumbling block Stitch the third diamond into the V  This is the wrong way to place your diamond onto your fabric!  We had great fun last Thursday. Everyone used the same template I had used, and cut their fabrics the same size as mine. But One of the ladies (who shall remain nameless) I don't want to embarrass her  though I was left red faced by this!!!  So anyway, one nameless lady called me over as she had a problem.  She had laid her template onto her fabric. But the fabric piece was too short - there was not enough to fold over at the points of the...